"There are 10 types of people in the world. Those who understand binary and those who do not."

Tuesday, 18 November 2014

Excel - Inserting the current Date and/or Time

When using Excel, there is often the need to enter a time, a date or even a combination of the two. Providing this data is entered is a recognised date/time format, Excel will treat the entered data as a value.

A quick way of entering the current date and/or time (providing they are set-up correctly on your PC) is to use the following short-cut key combinations;

To enter the current date (as set on your PC)

Ctrl key plus semi colon

<Ctrl> + ; 
(ie press and hold the Ctrl key and then press the semi colon character)

To enter the current time (as set on your PC)

Ctrl key plus colon

<Ctrl> + <Shift> + ; 
(ie Press and hold Ctrl key, press and hold Shift key and then press the semi colon character)

You can also add both the current date and current time into the same cell by using both the above techniques but you must put a space between the two. You can do it in either order (date then time or time then date) it doesn't matter although you will find that, by default, Excel will display the date before the time. This is a valid date/time format and can be used in calculations.

Another method of inserting the current date and time is to use the following function;

=NOW()

Care must be taken if using the =NOW() function as it is dynamic. This means that, every time the Excel worksheet refreshes or performs a calculation, this date and time will also be updated. The short-cut key methods mentioned above are static and will not change unless manually edited.


Thursday, 6 November 2014

Introduction to using IF in Excel

All too often the spreadsheet application Excel is used to produce professional looking tables of information. All very good, but, professional looking tables can also be created in Word - something Word was intended as well as other word processing tasks.  The real power of Excel lies in its ability to carry out mathematical operations from the most basic of adding two numbers together to performing complex statistical operations.

Excel has a number (well over 200) built in functions for the user.  An example of a simple function is;

=MAX(A1:A10)

What this function does is really quite logical.  It looks at all the values in range of cells A1 to A10 (10 cells in all) and displays the highest value.

The IF function is also a simple but very useful function, however, how it is used is often confusing to the new Excel user.  In a nutshell what it does is to perform a test and, if that test is true do something but, if the test is false, do something else.  The IF function is constructed as follows;

=IF(Logical test, What to do if test is true, What to do if test is false)

So, inside the (  ) there are three parts separated by commas,  The first part is the test to perform, the second part is what Excel should if the test is true and the final third part is what Excel should do if the test is false.

A simple IF function could look like this;

=IF(A1>=10,"More than or equal to ten","Less than ten")

In the above example the 'test' is to see if the value in cell A1 is greater than or equal to 10 (> means greater than) and, if this test is true (for example if the the value in A1=12) then display the text "More than or equal to ten".  If the value in A1 is less than 10, the text "Less than ten" will be displayed.

Of course, the 'what to do' bits could be calculations like this;

=IF(A1>=10,A1*1.5,A1*2)

Of course, this is just the start.  You can 'nest' functions (ie put functions inside other functions) to perform even more complex tasks.  For example;

=IF(MAX(A1:A5)>=10,"Maximum value is equal to or more then 10","")

In the above example, Excel looks at the values in the range of cells A1 to A5 and if the maximum value in this range is greater than or equal to 10, it displays the text "Maximum value is equal to or more then 10".  If all values are less than 10, then display nothing (hence the empty "") in the third part of the IF function.

Thursday, 30 October 2014

Tips for making selections in Word and Excel

When you are using Microsoft Word to create a document, you often wish to select some text in preparation for making some changes to its formatting (ie making it bold or underlined or italic or even a combination of formats).  So many times during my training career, I have seen Word users using the 'drag over' method to select text or even a single word.  In other words, they put the insertion point (the 'I' icon) before (or after) the word, hold down the left mouse button and then move the 'I' icon across the word to select it.  It works, but it is a bit tedious.  Here are a few tips for you to try;

Let's use the saying "The fat cat sat on the mat" as some example text

  1. To select the single word "cat"- perform a double click anywhere in the word.
  2. To select the sequential words "fat cat sat" - double click anywhere on the word "fat" (or "sat"), hold down the <Shift> key on your keyboard then double click on the word "sat" (or "fat").
  3. To select the non-sequential words "fat", "sat" and "mat" - double click on "fat", hold down the <Ctrl> key on your keyboard, then double click on "sat" then "mat" with the <Ctrl> still held down.
  4. To select all the text in a document - hold down the <Ctrl> and press the letter "A"
The above techniques also apply to selecting cells in an Excel spreadsheet.

Other selecting techniques you may wish to try in Word are available if you move the cursor to the left of the text until the cursor changes to the following;


  1. A single click will select the entire line of text.
  2. A double click will select an entire paragraph of text.
  3. A triple click will select all the text in the document.
I find that these methods, for me personally, are the most used.

Tuesday, 28 October 2014

Format Painter

There are many common features between the Microsoft Office suite applications.  Some we use on a frequent basis such as bold, italic, underline etc.  One feature that often gets overlooked but can save you time is the Format Painter.  In a Microsoft Office 2010 application, the Format Painter can be seen in the Clipboard group under the Home tab;

Format Painter Off

So, what is the purpose of the Format Painter?  The Format Painter is used to copy formatting applied to text in Word, a cell in Excel, a control on an Access form etc. and apply it to another piece of text, or a cell and so on. For example, you are creating a Word document and you format a title to be bold, font size 20, centered, underlined and in italics.  You wish to apply this same formatting to another title elsewhere in the document so, to save you making all those separate selections to achieve this, use the Format Painter.  Simple 'click' anywhere in the text you wish to copy the format from and click the Format Painter 'button'. This will change the Format Painter 'button' appearance to the following to indicate that it is on;

Format Painter On

The cursor will also indicate that Format Painter is active by changing to this;

Format Painter Cursor

Now simply click on the next title (piece of text, cell etc.) to apply the copied formatting to this new destination. The Format Painter button and cursor will now revert back to the 'inactive' state.

Tips:  

If you wish to apply the same formatting to a number of different locations (ie several titles, several cells) instead of single clicking the Format Painter when activating it, use a double click.  This will keep the Format Painter active so it will continue to be able to apply the copied format until you perform a single click on the Format Painter to de-activate it.

In Excel, the Format Painter will also copy number formats, conditional formats etc.


Monday, 16 December 2013

Excel Dates and Times - 1

Over the many years I have been using and training people to use Microsoft Excel, one area stands out and seems to cause confusion - that is using dates and times.

Key to understanding how Excel uses dates and times is to appreciate that it represents a date by a serial number and a time as a fraction of a day (expressed as a decimal fraction).  For example, the date 12/8/1998 would have a serial number of 36019.  3pm for the 12/8/1998 would have a serial number of 36019.625 and 7am for the 12/8/1998 would have the serial number 36019.2916666667 (0.625 being the fraction of the day gone by 3pm etc.)  Excel provides methods of displaying these date serial numbers in formats understandable to humans.

Excel is clever.  It recognises when you enter a date in a compatible format (ie 12/7/98).  Depending on the system settings in your particular installation of Excel, you will see on screen something like 12/07/1998 or 12 July 1998 but, behind the scenes, this date has been stored as a number (in this case 35988).

By now you might be wondering why 35988?  Where has this number come from?  By default, Excel allows you to start using dates from 1 January 1900  (ie serial number for 1/1/1900 = 1, 3/1/1900 = 3 and so on).  You cannot perform calculations using dates before 1 January 1900.  There is also an upper limit for dates too - 31 December 9999 (MostExcel users are not inhibited by this upper limit!).

As you look at options available with Excel 2010, you may see the option to use the 1904 date system.  What is all this about?  This allows compatibility with some early Macintosh systems which could not support dates prior to 1 Jan 1904 (all to do with the year 1900 not being a leap year) so serial numbers for these systems started in 1904 and not 1900.

More to come about dates and times in Excel to follow in a future post.

Wednesday, 11 December 2013

Don't always blame a virus

Yesterday a friend contacted me with a problem that almost all computer users dread.  How many times have we heard or even said ourselves;
"It was working OK yesterday but today it's not."
No matter how many times we perform the much suggested "Try turning it off and back on again", the computer still does not 'play ball'.  There could be a number of different scenarios from this point on;

  • The computer is completely 'dead'.  Possibly a flat or failed battery, a failed power supply even. Although expensive to repair (especially if it's a laptop) and time consuming if spares are required, it's not usually the end of the world.
  • The computer appears to start OK with the various, normal messages appearing on the screen but the Operating System (OS - Microsoft Windows etc.) does not seem to start.
  • The OS seems to start OK but then the problems start.
These are just a few of the possible scenarios and it was the last of the above which my friend's laptop presented her with.  Her laptop had appeared to start OK and to launch into Windows OK as it presented her with her user login screen as per normal.  It was at this point that the problems started.  Windows refused to recognise her login username and password and she could proceed no further.

It is at this point the much feared thought "Have I lost everything?" usually goes through the victim's mind.  Of course, a diligent computer user would have the same thought but would gain some comfort from the fact that they have been performing regular backups to some kind of external storage system.  I am sure that all of you reading this perform regular backups of your vital data don't you?  Or do you?  I am sure that, even if you don't - you know that you should be (hint, hint).

Having gone through the 'grief' stage of bereavement following the apparent 'death' of the much beloved computer, the 'anger' stage now kicks in.  It must be a virus that my computer has caught and you begin to curse all the creators of computer viruses.  Something that has always puzzled me is this.  To write a computer virus you need to have a considerable amount of technical, computer knowledge and an inventive imagination.  Why not direct these considerable talents in a more constructive direction for the benefit of all? To a certain extent, this is already happening with the ever expanding amount of material available in the world of 'open source' software.  Thanks guys - keep up the good work.

If you are still with me at this point, I must apologise as I have meandered off the path slightly.

My friend had assumed that the problem with her laptop was a virus for reasons I will come to later.  As an ex engineer required, in previous employment, to diagnose problems in aircraft systems, I know that it is essential to gain as many facts as possible before making a diagnosis.  In this case the facts were;
  • Up-to-date Anti Virus and Anti Malware software were installed and regular 'scans' performed.
  • She had not opened or received any 'dodgy looking' attachments.
  • She had not visited any websites via links received in eMails.
  • She had not installed any new software
My conclusion was that it was highly unlikely that a virus was the culprit.  A quick search of Google revealed that the symptoms presented were not uncommon and was almost certainly due to a corrupt entry in the Registry.  Just 20 minutes later after using Safe Mode, backing up the entire registry (just in case), and making a simple correction in the Registry the computer is now working again as per normal.

So why did my friend think it was a virus?  Well, this is usually the first culprit blamed when things go wrong but, in this case, she had been influenced by someone she knows who had had a similar problem (it may have been exactly the same problem or just similar - I cannot be sure) who had to have their computer software reset back to factory settings (ie hard drive 'wiped') with all the issues of reloading user software and, of course, all the backed up data.  A tedious process under any circumstances, but, even more frustrating if the data has not been backed up!

Computer viruses are annoying and frustrating but are not always responsible for the 'death' of a computer. Always remember though that, whatever causes a computer to 'die', your data will have an 'afterlife' provided you have taken out that life assurance policy of performing regular backups.

Saturday, 9 November 2013

Access Tip - Use a Parameter Query

Access is a very powerful database application from Microsoft.  Getting required information out of an Access database is done by using a 'Query' which will search given tables and return records displaying fields which have been specified in the query and matches given criteria.


The above simple example would return all the records from the tblEmployees table which have the surname 'Jones'.  The forename is also returned as this has been specified in the query.

All very well and, if the name to be searched for is changed to 'Smith' for example, it is relatively easy to edit the criteria accordingly - if you are comfortable with editing a query!

Turning this simple query into parameter query will  make it far easier for users who may not be familiar with Access but do know how to run a query.  So how do you make a parameter query?

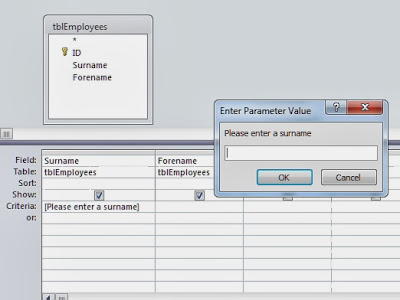
Instead of 'hard coding' the name to search for in the criteria (ie "Jones") replace it with a short phrase enclosed in square brackets [ ].  The text you enter in the [ ] can be anything you like - providing it is NOT the name of an existing field in the table (In this example it cannot be 'Surname' or 'Forename').  It is a good idea to make the phrase a prompt to remind the user what to enter.


When the above query is run, the user will be presented with the following dialogue box;


Using this technique makes running queries easier for those unfamiliar with Access.

Try the following in Criteria: to give more flexibility to using parameter queries.  This example will return all surnames beginning with the letters entered (ie entering 'J' will return Jones and James.  Entering 'Jo' will return just Jones);

Like [Please enter first letter(s) of surnames to search for] & "*"

In a date field, try the following to return all records with dates in the specified range;

Between [Please enter start date] and [Please enter end date]

In this example, you will be presented with the 'Enter Parameter Value' twice (once for each date to be entered) when the query is run.